Tuesday, September 3, 2013

Android 4.4 KIT KAT!


Today Google revealed the name of the next version of Android: Kit Kat! (For more information on Android Versions, check out the "Android Versions and You" blog post). Previously, the new operating system has had a couple teaser names like "Kandy Kane", and "Key Lime Pie,"  but Kit Kat was a surprise to everyone! I have absolutely no idea what this next version will bring, but my guess is that it'll be a UI change with some native gesture functionality like the Galaxy phones have. Android enthusiast could see Kit Kat as early as October, if rumors of a new Nexus device being released around that time hold true. Google is also partnering with Kit Kat to give away a Nexus 7, but you have to find the winning ticket in the specially marked brands of Kit Kat bars coming to stores soon.

Google's latest update (Android 4.3 Jellybean), brought lots of behind the scenes changes with the most noteworthy being:
  1. Bluetooth Low Energy Support - This will drain significantly less battery while using Bluetooth. Great for a Pebble owner!
  2. OpenGL ES 3.0 Support - This will provide better graphics for games, and other apps that use this technology.
  3. Profile Support - Allows you to have separate profiles for different users on your Android Device. GREAT for kids!
  4. Auto-Complete when Dialing - Many phones already have this feature but now it will be native to all Android devices on 4.3
  5. Performance Improvements while Idle - 4.3 manages background processes and apps far more efficiently than previous versions, ultimately allowing for better battery life
There are also revamped apps that dropped around the same time such as Play Music, YouTube, and Play Games. 

As we've seen when upgrading from Ice Cream Sandwich to Jelly Bean, decimal digit increments usually aren't HUGE overhauls from the previous version, however with Android becoming more and more refined each year, I'm sure the enhancements Kit Kat will bring will be sweet to say the least. 

Thanks for reading and please Follow and Subscribe!

Sunday, April 14, 2013

Android App of the Day: FACEBOOK MESSENGER!?!?!

YES! You read that correctly Facebook Messenger (download) is today's app of the day. When I first used Facebook Messenger, I couldn't really dig it because I didn't want to talk to my Facebook friends that much and it drained battery, but the latest edition has significantly changed what Facebook Messenger is. Like Handcent or Go SMS, Facebook Messenger is now, a TRUE messaging app. Let's dive into the features shall we?

SMS Support


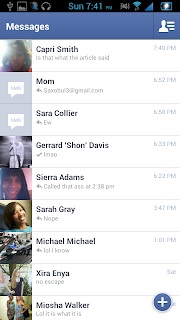
That's right! Ladies and Gentlemen Facebook Messenger now supports SMS. This means that you can read and write texts in your Facebook Messenger app. If you don't have a contact image set, or if the contact's Facebook page is not linked to their contact information, the blank SMS default icon will appear.


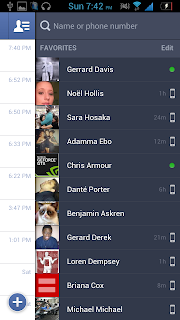
Clicking the top right icon will bring up your Facebook Messenger list as well as give you the option to enter contacts you would like to message at the top. Clicking the + sign will bring you to a new text/facebook message screen. The sent/receipt notification is still present when conversing with people via Facebook message (not via text) fyi.


Emoji Support

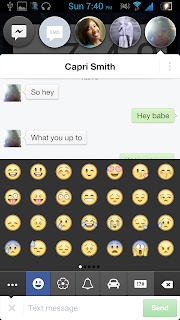
That's right folks! Facebook Messenger now has NATIVE emoji support! This means that you will not need a plugin to see emojis from others or send emojis. It should be worth nothing that not all Android emojis are supported and so occasionally you will see blank spaces. Also emoji support is native to Jellybean, so if you do not have Jelly Bean (Android 4.1+) you may not see these.


Voice Messages


When talking to a Facebook contact, you now have the option to send small voice recordings to each other. This is a sort of pseudo walkie talkie function but it's pretty cool. All you have to do is click Record Voice and then when finished send it. You can play back both your recordings and your friends recordings as often as you like.


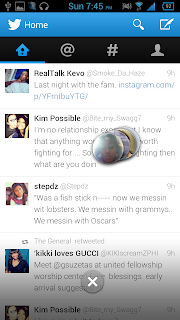
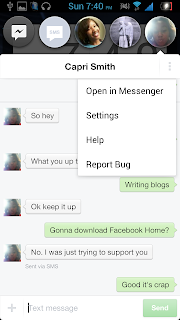
Chat Heads  Chat heads are the newest addition to Facebook Messenger. Each bubble contains the Facebook Profile pic, or the contact image (set on your phone) of the person you are currently


Chat heads can be dragged all across the screen, and can be situated on either the left or right side of the screen. That chat heads will sit on top of any app you're in, allowing for easy access to your text messages (they're always one click away!) When you dont want the chat heads visible, simply drag them to the x at the bottom of the screen that appears when moving them. You can have 4 chat heads at a time, and they can be re-ordered so you can choose which head to display first (the head on the far right displays first).


Upon clicking a chat head, you are taken to the conversation immediately. You cans swiftly move between conversations by clicking the chat head of the participant you would like to talk to, or if you do not see them, you can click the far left icon to return to your Facebook Messenger list. To return to the app you're currently in, just click the head of the conversation that is currently open.


Clicking the options button at the top left of the box presents you with options to open the conversation within the app, go to the apps settings, view help or report a bug.


Pros and Cons


Pros


  • The addition of chat heads offers functionality no other messenger app does: the ability to start or resume a conversation without ever leaving your current app. They are also really fun to play with
  • Having emoji support is always a godsend for Android users
  • It blends almost seamlessly with your text messages to allow for a virtually one stop shop for messaging. 
  • The online messenger is tied to the most popular online messenger (Facebook), so your friends wont need to go through the hassle of configuring another app for instant messaging. 
  • Record Voice function is fun
  • Supports group chat and file share!


Cons


  • MMS is unreliable. Often times pictures from my Galaxy S3 would not send. You'll still need your messaging app for this
  • Messenger only supports file share for pictures, but not mp3 files or documents

Final Thoughts


The revamped Facebook Messenger is the silver lining that came as a result to this entire Facebook Home fiasco. Its integration with SMS is genius and efficient. Chat heads are creative and functional, and this app is now my default messaging app (until I need to send a MMS)

Everything You Need To Know About Facebook Home

For those of you who don't know, last week Facebook released its new "launcher" called Facebook Home. A launcher is supposed to be a different UI (User Interface) for your phone. Is that what Facebook Home is? Well not quite. Let's go into a feature breakdown:

Home Select

Before using Facebook Home, it's going to request that you make it your default Home Launcher. This is so that whenever you hit the Home button, you will automatically pop back into the Facebook Home app. It should be worth noting that everytime you enter the Facebook Home app, your default home launcher is cleared/reset.


Cover Feed

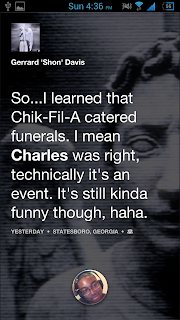
The cover feed is the biggest feature of Facebook Home. It takes friends posts (status updates and pictures) and displays them in a live wallpaper-esque format (the background picture is constantly moving). The text for each picture is displayed over the person's photo they posted, or over their cover page picture. From this screen, you have the ability to like or comment on the picture right there.

Notifications


When notifications come in, they appear on your cover feed and are able to be swiped away or clicked. Clicking the notification opens up the post on the Facebook app.


Upon tapping the screen, your Facebook profile picture appears at the bottom of the screen. This is kind of like the unlock icon on your lock screen.


Navigation


Upon tapping your name, you're presented with 3 options. 1 to go to the Facebook Messenger app, the other to your Facebook Home App Drawer, and the last to return to your previous launcher.


Shortcuts

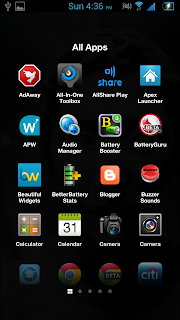
When you open up your app drawer, you have the option to scroll through various pages of apps (like on the left) or view them all on one page and scroll up and down (like on the right)  


Settings

Facebook Home comes with assortment of settings, the first being the most spectacular of them all:

  • Turn Off Facebook Home -  It does just what it says
  • Show Status Bar - This is the top bar of your phone where the notifcations are. With this selected, it will always be visible.
  • Show Home When Screen Turns On - This essentially turns your Facebook Home Cover Feed into your lock screen. When this is selected, a user can browse through your news feed, like and comment on pics, all before unlocking your phone.
  • Data Use - I'm not entirely sure what this does. It's default is set on Medium, but my best guess is this determines how often your cover feed tries to update
  • Messenger Settings - Settings for the Facebook Messenger app
  • Facebook Settings - Settings for the Facebook app
  • Everything else is self explanatory


My Pros and Cons

Pros

  • The cover feed is a wonderful idea, and is absolutely gorgeous
  • The cover feed can be used as your lock screen which is pretty impressive
  • Notifications appearing on your Cover Feed is a nice touch
Cons

  • Facebook Home literally tries to take over your phone. It does not play well with other launchers (Note: I could still execute some TouchWiz features like swipe to screenshot while within the app). The entire experience feels like two UI's fighting over control of your phone and in a way...it is
  • No widgets
  • Need to have the Facebook App and Messenger App installed to enable all functionality
  • Drains battery a little bit
  • Regardless of your security settings, someone can go through your news feed and comment on things if Facebook Home is set as your lock screen
  • Opening Facebook Home ALWAYS resets your default launcher, and you have to reset it each time if you choose another.

Final Thoughts

Facebook Home is a great app if you are a super Facebook junkie, but it is not a true launcher. It will always fight with your OS for control, and that can be really irritating at times. I think that overtime, Facebook Home will be revised to become more useful though, and am will look forward to checking out any improvements. If you want to download it from the play store, you need a Galaxy S3, Galaxy Note 2, HTC One, or HTC One X, click here. IF not, follow the instructions below if you truly want to try it out, here are some steps courtesy of xda developers (I'll also add them below)(NO ROOT REQUIRED)

To install Facebook Home on any device here are the steps:

  1. Download this file (the actual app)
  2. Download the Messenger app with a chat heads fix here
  3. Uninstall the original Facebook app (if already installed)(If it's pre-installed then you will need root permissions to remove it, sorry)
  4. Extract the .rar files 
  5. On your phone, go to your settings > security > and make sure "Unknown Sources" is checked
  6. Place all files on your phone's sd card (does not matter if internal or external)
  7. Install the com.facebook.katana app (Facebook) (have to navigate to it with your phones file explorer)
  8. Install the com.Facebook.Home (Facebook Home) app
  9. Install the com.Facebook.Orca (Facebook Messenger) app
  10. Enable Facebook Home under the Facebook app settings
  11. If you have any issues reboot your phone, if you still have issues and you have root permissions wipe your dalvikh cache, if you have issues and a reboot does not fix it and you do not have root permissions, uninstall all the above apps. 
Thank you guys for reading! 

Sunday, April 7, 2013

Android App of the Day: Kii Keyboard! Swype + Swiftkey = Kii!?!?


Today's app of the day is Kii Keyboard! It has the functionality of swype but also has the excellent word prediction of Swiftkey! It's highly customizable and extremely accurate. With the addition of the Handcent Emoji Plugin, inputting emojis is a breeze! Try it out and tell me what you think in the comments below!

So I've Rooted My Phone....Now What?

Now that you all have an overview on rooting, it's time to dive a little deeper into what exactly you can, and should do after rooting. First off, there are a few key components to your phones software that you need to be aware of.

The four key software elements that control the functionality, performance, signals, and look and feel of your phone are the:

1.ROM
2. Kernel
3.Modem
4.UI

1. ROM
   
    ROM (Read-Only Memory) image files are the files that make up the barebones of the software in our phones, on cd's (CD-ROM's) .iso files, and old video game cartridges. The hardware simply reads the file, and displays whatever is in it. For learning purposes, I want you to think of ROM's as the skeleton of the software makeup of the phone.

2. Kernel
   
   Kernels are the components of an OS (Operating System) that serve as the bridge between applications and the software. It dictates how your phone handles information, and where it goes. The speed of processing, how much battery to use when requested to do something, all of this is determined by the Kernel. Whenever there are battery issues on your phone, it is usually the Kernel's fault for not handling something designed in the ROM well.  Boot Animations (the animation when you turn on the phone), and the Recovery (the special screen when booting up your phone that allows you to install all of these things, as well as make backups) are all Kernel related. Think of the Kernel as the brain of the software makeup of your phone.

3. Modem

    The Modem (to the surprise of many of you) determines how well your phone transmits and receives signals. Some modems may perform better receiving a gps signal or receive faster data speeds than others. Since your phone emits power while searching for signals, having a solid modem can prove to increase battery life by not wasting as much resources searching for gps, data, or wifi signals. Think of the Modem as the sensory parts of the software makeup of your phone.

4. UI
   
    The UI (User Interface) determines the look and feel of your phone. These are the skins, themes, and additional features of a phone. For Samsung phones, they come with a Touchwiz UI. For HTC phones, they come with a Sense UI. Nexus phones have no UI overlay on their ROMS, and are just pure Android. Think of the UI as the clothing of the software makeup of your phone.

So now that you understand the four different components that makeup the software of your phone, we can talk about how rooting your phone allows you to change each and every one.

   To attain the full benefits of rooting your phone, you're going to want to install modifications for one, or all of the items listed above. If you want a ROM that has no UI and has pure Android? You can have it. Hate the battery life on your phone and want to install a different kernel which can slow down your processor or handle resource allocation easier? Install it! Getting really crappy Wi-Fi reception? Install a new modem! Want to keep the features of a UI but want more customization? Install a ROM with that UI still baked in.
Want a Star Wars theme to your phone? Find one and install one! Rooting your phone extends the amount of customization you can do to your phone in these ways, and all you have to do is install them to have them take effect.

Some places to look for ROMs, themes, and modems are:

XDA-Developers - http://forum.xda-developers.com/
Android Central - http://forums.androidcentral.com/
Rootz Wiki - http://rootzwiki.com/index

Some important rules of thumb though!

1. NEVER install a ROM, Kernel, Modem, or Theme developed for another phone! This is a SURE FIRE way to brick your phone! (UNLESS approved by the developer)

2. ROM, Kernel, Modem, and Theme combinations don't always play nice together. Be creative when mixing and matching, but make plenty of backups (done in recovery) just in case some things don't work.

3. Kernels designed for a specific ROM type (I.e. Touchwiz ROMs) do not work on AOSP (Android Open Source Project) AOKP (Android Open Kang Project), CM (CyanogenMod) or any other Pure Android (No manufacturer UI) ROM. ONLY use Custom UI Kernels for ROMS with that UI. Double-check if you are unsure. This also goes for Themes.

I think that wraps that up for today! I'll make sure to add any updates I forgot. Have fun guys, be safe, and keep flashing!

Friday, December 28, 2012

Android App of the Day: Skifta


Unless you've been living under a rock the past year, you've probably seen the Samsung Galaxy S3 commercial showcasing how you can "share pictures instantly" (with the baby picture). If you haven't, it's right here

Allshare Play is the app used to accomplish this with Galaxy phones....but what if you don't have (OR LIKE) Allshare? THAT'S where Skifta comes in!

Both Allshare Play and Skifta use DLNA (Digital Living Network Alliance) technology. This allows you to share photos, videos, and music within a network between compatible devices. So for example if you have a Smart Tv which is "DLNA Certified" you could access your files on your phone from your TV! The most common DLNA compatible devices are Computers, Phones, Tv's, Blu Ray Players, and Consoles. What Skifta allows you to do is access these devices easily, and it allows your device to be accessed as well. To test it out, try it with your computer!

- First download the app here
(During the setup, I'd recommend making a username and password. It requires no confirmation and gives you access to the apps full potential for free)

-Next on your computer (I have a PC so here are the windows instructions)
- Open up Windows Media Player
- Click "Stream"
- Select "Automatically allow devices to play my media" (this will allow any device with DLNA capabilities that has joined your private network to be able to access your music, videos, and pictures.)
- If you don't want to allow all devices on the network, click "More streaming options" and configure the devices you allow.

-On your phone start Skifta if you haven't already
-Connect to the wifi network your computer is on
- Click "Choose a media source" and choose which computer in the network you want to connect to.
-Next Select "Choose a player" and select your phone.

Now if you open up windows media player and look under the "Other libraries" section, you should see your phone. You can access the media on your phone from the computer! When you go to your phone and browse the media, you see everything that you're sharing to the computer.

To have some more fun let's switch this:
-Set the source as your computer and your phone as the player

Now you should be able to see all the media on your computer and you'll be able to play any song or video.

Have a PS3? Connect it to the same wifi network as your phone, cut on Skifta, and then on your PS3, navigate to the media server. You'll be able to access the media from your phone or computer if you connected it to that instead.

If you registered, you now have remote functionality!

To enable this, go to windows media player, click stream, then select "Allow remote control access of my player"

Now select your phone as the source, and windows media player as the target.
Now when you click on pictures, music, or video, they will show up on your computer screen in windows media player!

Skifta also gives you functionality to add channels, which will allow you to do things like view your instagram photos on any device, or stream from r.dio.

All in all, Skifta is a cool app which makes great use of DLNA technology. You can easily display media on a friends phone as well, and if you want to show off a photo, you can have everyone in the room check out that photo. It doesn't have group cast photo like Allshare does though, but it's ability to be used on any DNLA device instead of just Samsung devices more than makes up for it! I know this was a long app of the day entry but try it out and tell me what you think! Also I HIGHLY recommend downloading the pc portion of Skifta here. You'll have to make a Windows Live ID to get everything working completely though. This will enable you to access your home network without being on the same wifi network. So for example with my Sprint 4G, I can still stream media from my home computer to my phone (albeit slower). Check it out and I think it's a pretty clear winner which phone dominated 2012, but there are still 3 days left to vote! Thanks for reading!

Thursday, December 27, 2012

How to Root Your Galaxy S3


Note: The hardest part about rooting the Galaxy S3 is just getting it in the damn modes lol  I'll walk you through but I'll also have attach a video for you to follow along with just in case. 

First off, if you need an overview for what rooting is all about, I invite you to read this wonderful post here before we begin.
This root method works for the Sprint/AT&T/T-Mobile Galaxy S3's. If you're on another carrier it may not work and therefore is not worth the risk. 

The files you will need are:

 The most important link. This is what will actually give you root access. Put this on your sd card (internal or external) and make sure you LEAVE IT ZIPPED.

Gotta have drivers so your computer can recognize your phone.

Put this file on your desktop or somewhere you wont forget it. Make sure to extract it if you need to.

A recovery is the mode used to install updates and factory reset your phone manually. Just in case you can't get your phone to boot up. It's a mode which allows you to recover your phone still even if no operating system shows up. With a CUSTOM recovery, instead of using it to put the regular operating system you would put if you need to recover your phone, you'll put a CUSTOM one on there instead. The OS's that you put on are called ROMs. What you're on right now is a STOCK ROM so that's the ROM that comes fresh out the box. What we're going to do to start you off is add root capability to the STOCK ROM. That way you get the best of both worlds until you are ready to go full custom.

Odin is a special tool that is used to Root and add custom things to Samsung phones only. This is the tool we're going to put the custom recovery on with. Make sure you extract this.

So here is a quick overview of what you'll need to do.

We're going to install the Samsung Drivers so your computer and Odin can recognize your phone. Then we're going to use Odin to put a temporary custom recovery on your phone. Once you are in the temporary custom recovery, we're going to install the root zip. Then you're done! Easy right?

To get into Odin mode (or Download mode) you turn off your phone, then once it's completely off you're going to turn it on and hold the POWER, HOME, and VOLUME DOWN buttons before you see any text. Once some text flashes you should see like a warning message shortly after. THAT'S when you let go. If it still is turning on and you never get the warning message, you gotta power down and try again. 

To get into recovery is much easier. Power down your phone, and then when it's completely powered off, turn it on and hold the POWER, HOME, and VOLUME UP buttons this time. Look for some tiny blue text to flash for a split second in the top left corner. Once you see it, let go and you'll be in Recovery. 

NOTE: 

If your phone starts to load the Stock ROM when you boot it up, it will erase the temporary custom recovery and replace it with the stock recovery. Therefore, it's imperative that after you finish using Odin when you reboot your phone you have to get it into the custom recovery or else you have to re-do the Odin portion. 

Here is a step by step breakdown:

1. Download and install the Root.zip and place it on your internal or external sd card.
2. Download and install the Samsung Drivers
3. Download and extract the Odin tool
4. Unplug your phone (if it's plugged in)
5. Run Odin as an administrator.
6. Uncheck auto reboot
7. Put your phone into download mode (Turn it off. Then once it's off, turn it on and immediately hold POWER, HOME, and VOLUME DOWN)
8. Once in download mode, press Volume Up to continue
9. Plug in your phone to the computer. If done correctly, a blue box should pop up in Odin with the word "Added!" inside.
10. Click the PDA button and select your recovery tar file. 
11. Once the file has been selected click "Start" to start the Odin process.
12. Once completed, you should see the word "PASS." Once you see this word, unplug your phone and turn it off (pulling the battery is the best way to ensure power off)

*NOTE: THIS IS THE IMPORTANT STEP! IT WILL NOT BRICK YOUR PHONE BUT IF YOU DON'T GET THIS RIGHT YOU HAVE TO START OVER AT STEP 7*

13. Turn on your phone and immediately hold POWER, HOME and VOLUME UP. If done correctly you will be in your custom recovery. It should be turquoise color and have many options.
14. To navigate the recovery, you will use volume up and down to move up and down, power button to make selections, and back button to go back.
15. Once here you will go to the "install from sd card" option. If you put the root.zip on your internal sd card (the one you can't take out) then select install from internal sd card. Vice versa for external.
*NOTE: This next step is how you're going to install custom things on your phone from now on. You will boot into recovery, wipe your data and cache's, and install ROMs, Modems, Tweaks, anything via recovery.*

16. After you have installed the root zip (the text will tell you when the process is completed) go back to the main screen and reboot your phone. CONGRATULATIONS! YOU NOW HAVE ROOT!

Now that you are rooted, you can download special apps that require root like ad blockers (https://play.google.com/store/apps/details?id=org.adaway&feature=nav_result#?t=W251bGwsMSwyLDNd ), but you won't be able to enjoy all the advantages of being rooted until you install a custom ROM or Kernel. When you are ready to do so, you will have to backup your texts, contacts (verify that your contacts are backed up), and apps (note, never backup system apps, only apps you can download from the playstore), use Odin to put the custom recovery back on, wipe data (if installing a ROM), cache (located in cache section on main menu), and dalvik cache (located in advanced section of main menu) , then install the ROM or kernel. Once you have done this you will have a permanent custom recovery until you change ROMS or kernels again. 


Also for ROM locations, I personally like to use xda-developers to search. When you are ROM and Kernel shopping, make sure to read the posts to see the experiences others are having (good battery life, bad apps etc...) and always always ALWAYS! Read the instructions before flashing a ROM to make sure you do it properly. The ROMS and Kernels are in development sections and the themes and apps are in the themes sections. General section has general topics about the phone, and Q&A is self explanatory. 

Here are the forum links:


Feel free to contact me if you have any questions!